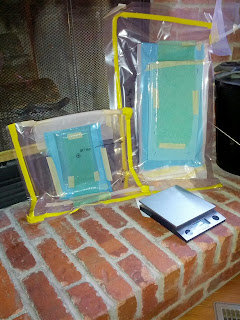
I made two test panels this time around. Both were connected to the same vacuum line via a "T" fitting.
The smaller piece is a 26 layer solid glass panel for the UFS bearing plate. It should have been 12mm thick, but it came up a bit thin. So, the actual pieces will need another layer or two to bring it up to the correct thickness. The plumbing for this piece also included a reverse pull tube to remove excess resin. I waited for a complete infusion and after pinching off the supply line I opened up the reverse line. Resin quickly moved out of the part bringing along a lot of air bubbles and foam. I watched the piece for about forty seconds before noticing the top of it starting to look dry. At that point, I pinched off the reverse tube and waited for the epoxy within the part to redistribute itself.
Twenty minutes later, the part looked the same and the foaming in the reverse pull tubes had settled down to clear epoxy again. The piece looked like it needed just a little bit of resin reintroduced, but I had already removed the resin supply and cut the intake tube. So I took a small piece of packing tape and a sewing needle to puncture the reverse pull tube. As soon as the tip of the pin made it through the tubing the resin was quickly pushed back toward the part. I used the packing tape to reseal the hose and stop the flow. An easy resolution and a good test. In one of the pictures below, you can see it being held up blocking the sun. There are no visible air bubbles. Unfortunately, I did not weigh the piece before the infusion.
The bulkhead panel was a test to see how well the resin would flow through the punched holes through to the other side. I installed Resin Distribution media on the top side only to see how gravity and vacuum would distribute to the bottom.This worked OK - except I can see some bubbles in the drilled holes.
The bottom was a bit drier than the top. I believe it will be better to skip the drilling and simply run distribution media along the top and bottom to make the panels.
 |
| First successful Infusions |
 |
| Bulkhead and solid glass laminate test panels |
 |
| 11mm of solid glass - no visible bubbles |
 |
| Test Panel Properties |
Last thing for this post is resin breaks, whoever came up with that is genius! The resin will always find the shortest path the vacuum, usually race-tracking somewhere along the part, even if it is a solid piece of glass. That is until it hits the resin break. At that point, the flow will stop and is then forced to fill out the rest of the part. It does however require some patience and faith...
I've noticed you can tell how far along the infusion actually is by observing the resin breaks. When they are saturated, your piece is also saturated. But do take that with a grain of salt as my experience level is extremely limited!
No comments:
Post a Comment