Monday, April 25, 2016
Tuesday, April 19, 2016
Thursday, April 14, 2016
Tuesday, April 12, 2016
Infusion Reply & musings...
I received a letter from one of my fellow boat-building friends and since I spent so much time on the reply, I thought I'd go ahead and post it here and open it up for further dialog.
================================
Have you seen the RIC from airtech?
(This is a HDPE molded "puck" that is used for in bag connections. It is reusable)
Yes, I have - in fact I have one or two but you still have to clean them before reuse.
I used it once a while back and it's available if I want to try again, but it's getting hard to beat a disposable one made from scrap foam. So far, I think it takes less time to make one with a sanding block and dremel than clean the RIC.
Also I'm not sure why you would get resin starvation if there is no vacuum
leaks?
I apologize for the lengthy reply, but this is a VERY INTERESTING topic and I've spent a lot of time reading up on it.
(Although I freely admit that I'm far from becoming an "expert" on the process.)
So let's start with my first assumption:
It seems logical that if you arranged your infusion stack with a peel ply resin break and there was NO leaks in the bag you should be able to open up the resin supply until the resin front completely moves throughout the fabric and into the resin break before shutting off the supply. Now that the resin supply has been cut off and there should no longer be any resin movement in the bag and it should simply stop flowing and cure in place. However, in reality that is not at all what happens, what does happen is that the resin "blob" continues to migrate toward the vacuum source until it begins to gel and then resistance to flow is what finally stops it. During that "migration" time, the resin will move out of the previously saturated fibers in various degrees and leave behind a dry laminate.
As for leaks in the bag - so far I really haven't had much issues with an airtight bag. The big leaks are easy to find and the ultrasonic leak detector plus watching the digital readout on the pressure guage has proven that my bags have been really tight so far, so while nothing is perfect - I'm mostly confident that the bag is tight.
Regarding the infusion process itself, I have completed several infusions to date and continue to make modifications to my process. The good news is that I am making progress and my last infusion came out nearly perfect with only a small dry spot (and I already know how to fix that for next time).
So beginning with the layout itself (flat surface - eight layers) configured to infuse from one side to the other using Enka Fusion for both the supply and vacuum feeds.
(Note - I REALLY like the Enka fusion over spiral wrap as it's just easier to work with and there are no concerns with it putting a hole in the bag or leaving an impression on the part itself).
Now before we get started, I'll switch gears for a second to talk about epoxy volumes.
I've found that I can get a really good estimate on the epoxy quantity required by figuring out the TOTAL square inches of all the fabric layers in the layup and then multiplying that number by .31. (.31 grams is REALLY close to what is consumed per square inch, this number includes epoxy left over in the peel ply, perf film, distribution media, the underside of the bag and the amount left in the tubing.
So for example, with my 100:30 epoxy mix ratio:
***********************************************
4380 square inches*.31 = 1357 grams of epoxy required.
1357/1.3 = 1044.4 grams of Part A
1044.4*.3 = 313.3 grams of Part B
===========================
1044.4 (A) + 313.3 (B) = 1357 grams of epoxy
===========================
***********************************************
Anyway, in previous infusions I have allowed the resin front to reach the resin break before shutting off the resin supply. I have also experimented with adjusting the vacuum from 15mbar to 50mbar to slow the resin movement, but that didn't really do anything but allow the stack to cure at a lower vacuum level (which creates a less than ideal fabrics compaction).
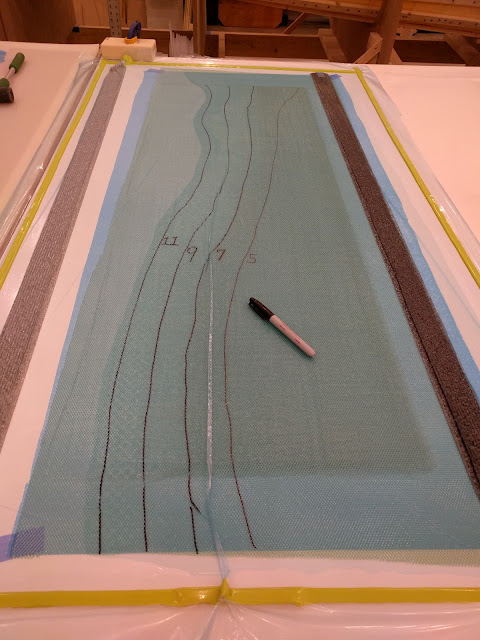
With my latest infusion, I allowed the Enka Fusion VACUUM STRIP (left side of photo) to become maybe 5% saturated before CLAMPING off both the vacuum and supply lines ( I did leave the vacuum line attached to the pump to slowly compensate for any vacuum loss in the bag if necessary). What I was hoping for was that excess resin in the stack would migrate into the empty spaces of the Enka Fusion and then stop for curing. What actually happened is that the resin did continue to move into the empty spaces, completely filling up the Enka Fusion VACUUM STRIP and moving up into the vacuum tube toward the clamp. Overall, a much better infusion already, but in hindsight, I could have eliminated one small dry area by allowing maybe 20%(?) Enka Fusion saturation on the vacuum side. That way it wouldn't pull as much resin from the stack. I guess with experience you can do a better job of this, but that's where I'm at now.
Now with all that being said and in the spirit of continual experimentation my next infusion will incorporate a "reverse pull" line. (Vacmobiles had a poster detailing the process, but I can't find it at the moment - Found it (Picture at bottom of site)) and a slight adjustment to the VACUUM STRIP flooding.
This just means that I'll have a vacuum line from the RESIN SUPPLY side of the stack over to the vacuum pump. When I do the actual infusion, I'll allow the Enka Fusion on the VACUUM side to become maybe 80% saturated before clamping off both that line and the resin supply line.
Once that's done, I'll open the clamp on the "reverse pull" line for a little while to remove some excess resin from the supply side and bring the vacuum level back down since this Resin supply area is actually very near ambient pressure. My "thinking" is that since the stack is now flooded this process will create a "hydraulic lock" situation (probably not the correct word to use). Since the epoxy itself as a fluid is incompressible, it won't move around on it's own other than (I assume) responding to gravity itself by attempting to level out somewhat. My thinking is that the ~20% vacuum space within the Enka Fusion will allow the resin some room to move into if needed, but in reality I believe the resin will mostly stop flowing and cure in place.
We'll see what happens...
This process, (if it works as expected) should mimic the flow characteristics of the "MTI Hose" by stopping the resin flow when it hits the semi-permeable sleeve (in this case, the Enka Fusion saturation) but going one step further than the "MTI Hose" by restoring vacuum on the supply side. I suspect this will produce a more compacted stack while eliminating any dry spots.
Further testing will either confirm this process or prove that I (still) have no idea what I'm talking about.
For resin break I use peel ply wrapped over a spiral wrap (RIC fits over that).
Try the Enka fusion, I think you might throw that spiral wrap into the trash can.
:)
Oh, and bonus notes here:
I will pour out a small amount of left over resin from the bucket directly onto the surface of the infusion bag. Anywhere is fine I guess. This provides an excellent reference to the state of the epoxy curing inside the bag.
================================
Have you seen the RIC from airtech?
(This is a HDPE molded "puck" that is used for in bag connections. It is reusable)
Yes, I have - in fact I have one or two but you still have to clean them before reuse.
I used it once a while back and it's available if I want to try again, but it's getting hard to beat a disposable one made from scrap foam. So far, I think it takes less time to make one with a sanding block and dremel than clean the RIC.
Also I'm not sure why you would get resin starvation if there is no vacuum
leaks?
I apologize for the lengthy reply, but this is a VERY INTERESTING topic and I've spent a lot of time reading up on it.
(Although I freely admit that I'm far from becoming an "expert" on the process.)
So let's start with my first assumption:
It seems logical that if you arranged your infusion stack with a peel ply resin break and there was NO leaks in the bag you should be able to open up the resin supply until the resin front completely moves throughout the fabric and into the resin break before shutting off the supply. Now that the resin supply has been cut off and there should no longer be any resin movement in the bag and it should simply stop flowing and cure in place. However, in reality that is not at all what happens, what does happen is that the resin "blob" continues to migrate toward the vacuum source until it begins to gel and then resistance to flow is what finally stops it. During that "migration" time, the resin will move out of the previously saturated fibers in various degrees and leave behind a dry laminate.
As for leaks in the bag - so far I really haven't had much issues with an airtight bag. The big leaks are easy to find and the ultrasonic leak detector plus watching the digital readout on the pressure guage has proven that my bags have been really tight so far, so while nothing is perfect - I'm mostly confident that the bag is tight.
Regarding the infusion process itself, I have completed several infusions to date and continue to make modifications to my process. The good news is that I am making progress and my last infusion came out nearly perfect with only a small dry spot (and I already know how to fix that for next time).
So beginning with the layout itself (flat surface - eight layers) configured to infuse from one side to the other using Enka Fusion for both the supply and vacuum feeds.
(Note - I REALLY like the Enka fusion over spiral wrap as it's just easier to work with and there are no concerns with it putting a hole in the bag or leaving an impression on the part itself).
Now before we get started, I'll switch gears for a second to talk about epoxy volumes.
I've found that I can get a really good estimate on the epoxy quantity required by figuring out the TOTAL square inches of all the fabric layers in the layup and then multiplying that number by .31. (.31 grams is REALLY close to what is consumed per square inch, this number includes epoxy left over in the peel ply, perf film, distribution media, the underside of the bag and the amount left in the tubing.
So for example, with my 100:30 epoxy mix ratio:
***********************************************
4380 square inches*.31 = 1357 grams of epoxy required.
1357/1.3 = 1044.4 grams of Part A
1044.4*.3 = 313.3 grams of Part B
===========================
1044.4 (A) + 313.3 (B) = 1357 grams of epoxy
===========================
***********************************************
Anyway, in previous infusions I have allowed the resin front to reach the resin break before shutting off the resin supply. I have also experimented with adjusting the vacuum from 15mbar to 50mbar to slow the resin movement, but that didn't really do anything but allow the stack to cure at a lower vacuum level (which creates a less than ideal fabrics compaction).
With my latest infusion, I allowed the Enka Fusion VACUUM STRIP (left side of photo) to become maybe 5% saturated before CLAMPING off both the vacuum and supply lines ( I did leave the vacuum line attached to the pump to slowly compensate for any vacuum loss in the bag if necessary). What I was hoping for was that excess resin in the stack would migrate into the empty spaces of the Enka Fusion and then stop for curing. What actually happened is that the resin did continue to move into the empty spaces, completely filling up the Enka Fusion VACUUM STRIP and moving up into the vacuum tube toward the clamp. Overall, a much better infusion already, but in hindsight, I could have eliminated one small dry area by allowing maybe 20%(?) Enka Fusion saturation on the vacuum side. That way it wouldn't pull as much resin from the stack. I guess with experience you can do a better job of this, but that's where I'm at now.

Now with all that being said and in the spirit of continual experimentation my next infusion will incorporate a "reverse pull" line. (Vacmobiles had a poster detailing the process, but I can't find it at the moment - Found it (Picture at bottom of site)) and a slight adjustment to the VACUUM STRIP flooding.
This just means that I'll have a vacuum line from the RESIN SUPPLY side of the stack over to the vacuum pump. When I do the actual infusion, I'll allow the Enka Fusion on the VACUUM side to become maybe 80% saturated before clamping off both that line and the resin supply line.
Once that's done, I'll open the clamp on the "reverse pull" line for a little while to remove some excess resin from the supply side and bring the vacuum level back down since this Resin supply area is actually very near ambient pressure. My "thinking" is that since the stack is now flooded this process will create a "hydraulic lock" situation (probably not the correct word to use). Since the epoxy itself as a fluid is incompressible, it won't move around on it's own other than (I assume) responding to gravity itself by attempting to level out somewhat. My thinking is that the ~20% vacuum space within the Enka Fusion will allow the resin some room to move into if needed, but in reality I believe the resin will mostly stop flowing and cure in place.
We'll see what happens...
This process, (if it works as expected) should mimic the flow characteristics of the "MTI Hose" by stopping the resin flow when it hits the semi-permeable sleeve (in this case, the Enka Fusion saturation) but going one step further than the "MTI Hose" by restoring vacuum on the supply side. I suspect this will produce a more compacted stack while eliminating any dry spots.
Further testing will either confirm this process or prove that I (still) have no idea what I'm talking about.
For resin break I use peel ply wrapped over a spiral wrap (RIC fits over that).
Try the Enka fusion, I think you might throw that spiral wrap into the trash can.
:)
Oh, and bonus notes here:
I will pour out a small amount of left over resin from the bucket directly onto the surface of the infusion bag. Anywhere is fine I guess. This provides an excellent reference to the state of the epoxy curing inside the bag.
Monday, April 11, 2016
Subscribe to:
Posts (Atom)