Tuesday, May 21, 2013

Sticky Stuff Epoxy Dispenser Arrived

As promised, a brand new epoxy dispenser arrived on the doorstep today.

This is destined to be the "laminating" pump.
The one loaded with the epoxy blend used for general layups, filleting & etc.

I plan on getting another one (maybe a Model B - larger capacity) for Infusions.
That one will have the static mixing block installed.


Monday, May 20, 2013

Graduation Week - Epoxy Dispenser on the way

My daughter graduated High School (HomeSchool) this weekend.
We spent most of last week working on decorations. It was fun and quite a milestone in her life.
Three down, three to go!
She's been a real treat all these years, a big joker, mostly always happy and laughing about something.

This is certainly not the end for her, but rather the first step in the rest of her life.

Now we need to see about getting all the glitter removed from the carpets!

I did manage to score a brand new "Sticky Stuff Model A" epoxy dispenser off eBay from a nice guy down south. He had purchased it to build a composite aircraft but life events happened and those plans got over-written for the time being... It was never used, still in factory packaging.

It should be here tomorrow.

The hardener I'm using has a CPS value of 20, which is very thin and may require a replacement intake valve for "low viscosity" fluids. Michael Engineering says it will cost about $35 if necessary.
I plan on using this pump for regular laminating epoxy and picking up another pump with the mixing head/static mixer option for use as the Resin Infusion supply.

Still so much equipment, tools & supplies to purchase before I can get started - but things are falling into place and more importantly - the Visa is staying paid off!

Monday, May 13, 2013

Successful Infusions!

This past weekend I had my first success at Resin Infusion!

I made two test panels this time around. Both were connected to the same vacuum line via a "T" fitting.

The smaller piece is a 26 layer solid glass panel for the UFS bearing plate. It should have been 12mm thick, but it came up a bit thin. So, the actual pieces will need another layer or two to bring it up to the correct thickness. The plumbing for this piece also included a reverse pull tube to remove excess resin. I waited for a complete infusion and after pinching off the supply line I opened up the reverse line. Resin quickly moved out of the part bringing along a lot of air bubbles and foam. I watched the piece for about forty seconds before noticing the top of it starting to look dry. At that point, I pinched off the reverse tube and waited for the epoxy within the part to redistribute itself.
Twenty minutes later, the part looked the same and the foaming in the reverse pull tubes had settled down to clear epoxy again. The piece looked like it needed just a little bit of resin reintroduced, but I had already removed the resin supply and cut the intake tube. So I took a small piece of packing tape and a sewing needle to puncture the reverse pull tube. As soon as the tip of the pin made it through the tubing the resin was quickly pushed back toward the part. I used the packing tape to reseal the hose and stop the flow. An easy resolution and a good test. In one of the pictures below, you can see it being held up blocking the sun. There are no visible air bubbles. Unfortunately, I did not weigh the piece before the infusion.

The bulkhead panel was a test to see how well the resin would flow through the punched holes through to the  other side. I installed Resin Distribution media on the top side only to see how gravity and vacuum would distribute to the bottom.This worked OK - except I can see some bubbles in the drilled holes.
The bottom was a bit drier than the top. I believe it will be better to skip the drilling and simply run distribution media along the top and bottom to make the panels.
First successful Infusions
Bulkhead and solid glass laminate test panels


11mm of solid glass - no visible bubbles
Test Panel Properties
 Some workflow items still need to be sorted out - most importantly is a better resin supply system. Dipping Resin out of a metal container is not efficient and leads to a big mess. I'm looking for a couple "Sticky Stuff" dispensers to take care of that part. The next small issue is to work out some inexpensive way of reliably holding the resin pickup tube into the bottom of the resin supply container. The PE hose wants to curl up and resume the shape it had on the roll. I will try heating it up while holding it straight to make it relax. The pickup tube idea is scratched for now simply due to unnecessary connections in the system. Anything you can do to eliminate a connection is good practice!

Last thing for this post is resin breaks, whoever came up with that is genius! The resin will always find the shortest path the vacuum, usually race-tracking somewhere along the part, even if it is a solid piece of glass. That is until it hits the resin break. At that point, the flow will stop and is then forced to fill out the rest of the part. It does however require some patience and faith...

I've noticed you can tell how far along the infusion actually is by observing the resin breaks. When they are saturated, your piece is also saturated. But do take that with a grain of salt as my experience level is extremely limited!

Tuesday, May 7, 2013

Weekend failures

Another disappointing weekend on the books for Infusion testing.

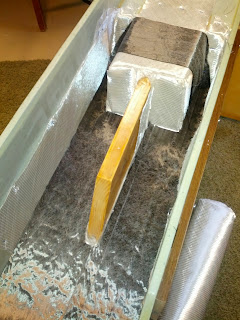
I tried to duplicate the original layer test and attempted to make a "V" shape with the Resin Distribution media to force it through the thick layers of fabric before taking a shortcut. This seemed to work, but I cut the distribution media too far away from the vacuum port and the infusion stalled after an hour (moving only 7cm past the tip of the distribution media).
"V"-shaped distribution media, cut too short
Once the infusion stalled, I just stopped it and removed all the materials into the garbage.
No sense in letting it hang around and take up space.
The next infusion was a perforated piece of foam (no pictures) to simulate a double-sided bulkhead infusion.
Things were going well until I clamped down too hard on the resin inlet line trying to throttle the flow and cut the tubing. Then I tried putting on another clamp which weighed down the inlet port causing it to pop out of the tacky tape seal. That was because I was using the smaller diameter PE line instead of 1/2".
Then to finish off the disaster, I tried replacing the line with a 1/2" tubing and ended up ripping the bag.

A "not so funny" comedy of errors - so I just sat there with a stupid look on my face and decided it was time to clean up for the day.

The next day, I decided no more lay-ups and infusions in the same day!
Layups will be on one day - Infusions will be the next.
It's just too much for me at this stage, plus there is a whole different set of tools and supplies required for each operation. Leading to clutter and chaos.

Changing gears, I spent the next day working on the beam mold fabric layup.
Still some more layers to do yet.

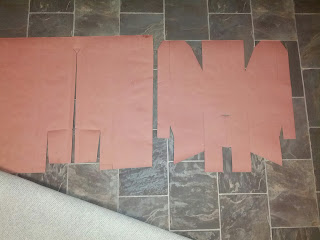
Two-Piece Patterns for Beam Recess
 

Some Carbon layers
More Carbon Uni


Still some more glass to layup


I also built a valve assembly to regulate the resin flow.


I realize you can purchase disposable valves, but those prices can add up and I'm curious to see if a "real" valve can be cleaned out and reused since the resin is relatively thin and will nearly drain out completely.

I'm thinking a vinegar bath with some Q-Tips will do the trick..?

Another problem I ran into was inadequate Resin supply mixture. The spreadsheet I developed to calculate the required amount needs some modification to add more for the disposable layers. An easy fix, but maybe not even required in the long run? I've found an epoxy distribution machine that has the option to add an inline static mixing block. The static mixers are expensive, but the idea of simply pumping out what is needed/as needed along with less air trapped into the mix and a continuous fresh supply being fed into the part might well end up off-setting those other costs.

Next weekend (depending on supplies remaining) I'll try another layer stack and  bulkhead infusion test.